Reverse Engineering
TBM Avenger Aircraft Counterbalance Fabrication
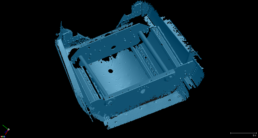
Problem: Removing original equipment, like machine guns and ammo, from the aft belly machine gun on a TBM Avenger made a noticeable difference in flying characteristics.
Proposed solution: Add a counterbalance to an open area in the same vicinity, as identified by a maintenance director.
Question: How to measure a complex space in order to fabricate an exact-fitting steel container in a short time frame?
Answer: Use 3D scanning
PROJECT BENEFITS USING 3D SCANNING
- Quantity of design and fitment errors are greatly reduced compared to traditional means of measuring.
- Volume of available space was maximized from accuracy of scan.
- Time to fabrication greatly reduced by producing CAD model faster.
- No re-work of fabricated part – perfect fitment on first attempt.
- Estimated time savings compared to traditional means of measuring and designing: 8-12 hours.
Beech 99 Engine Cowl Modification
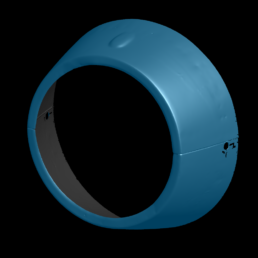
A regional cargo carrier operates with Beechcraft model 99s. They needed a solution for repairing cracks in the engine cowl. This case study explains how Aeroscan got involved and used 3D scanning to reverse engineer and fabricate a perfectly fit doubler for a repair.
When it comes to repairs, the real challenge is constructing the steps to arrive at a solution. This was the situation that presented itself to the maintenance team at Bemidji Aviation Services Inc. (BASI). The team decided they needed a repair solution for cracking engine cowls on Beech 99s. The solution—fabricating a doubler that could be installed to strengthen the cracking area. Yet because of the difficult shape and challenging nature of trying to measure a cylindrical shape like a cowl, how would they possibly fabricate anything that would fit accurately? If 3D scanning technology was a viable option, would it provide the level of accuracy necessary for fabricating a perfectly fitting part and not exceed the budget assigned to the project?
Immediately upon inspecting the existing conditions, Aeroscan determined that this was an excellent application for 3D scanning. Aeroscan explained that as an object’s measurable surface becomes more complex, the benefits from 3D scanning directly coincide. The project began with scanning the cowl on the ramp. Within 1 hour a full scan of the entire affected cowl was captured. The typical reverse engineering workflow of importing the 3D scan reference used in modeling the new piece in CAD could begin. After another 4 hours Aeroscan had a working CAD model. This CAD model is what is used for whatever is the best determined fabrication process. In this case, because of its cone shape, an operation termed spin forming was used on 2024-O, 0.032” aluminum. Finally, following a T42 heat treatment, conductivity, and hardness tests were performed to bring the new doubler to specifications.
The new spun doubler fit perfectly and on the first attempt! The time saving benefits are not only made on the front-end when measuring the part but at the back-end when the part fits flawlessly for the mechanic, post fabrication.
In this case, the time to complete this project utilizing 3D scanning is difficult to compare against traditional measuring efforts because those steps were too risky and challenging to even attempt. ROI is often measured in dollars and cents. However, when taking advantage of technology that conquers efforts that were previously deemed too difficult, it’s the value in solving a problem that provided this maintenance team with another level of ROI–simply executing the steps to arrive at a solution.
PORTABLE 3D LASER SCANNING BENEFITS
- Versatile: Virtually limitless 3d scanning – any part size, complexity, material or color.
- Metrology-Grade Measurements: Accuracy of up to 0.0012 in., resolution of up to 0.002 in., high repeatability and traceable certificate.
- Standalone Device: no external positioning system, no arms, no tripod or fixture.
- No Rigid Setup Required: the part and scanner can be moved freely during scanning. Take it from place to place or use it in-house or on-site.
- Automatic Mesh Output: real-time visualization.


